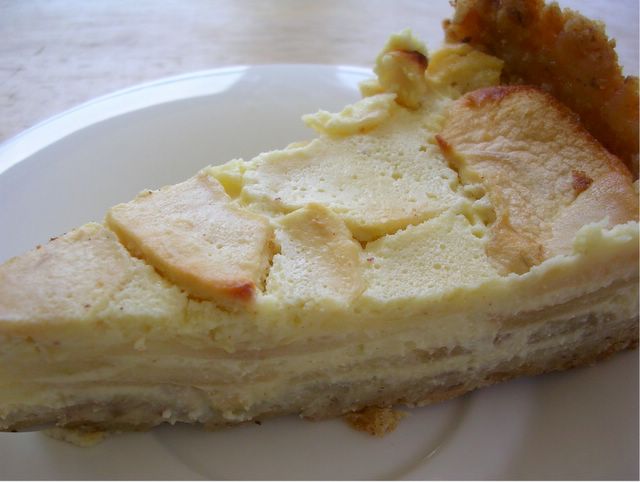
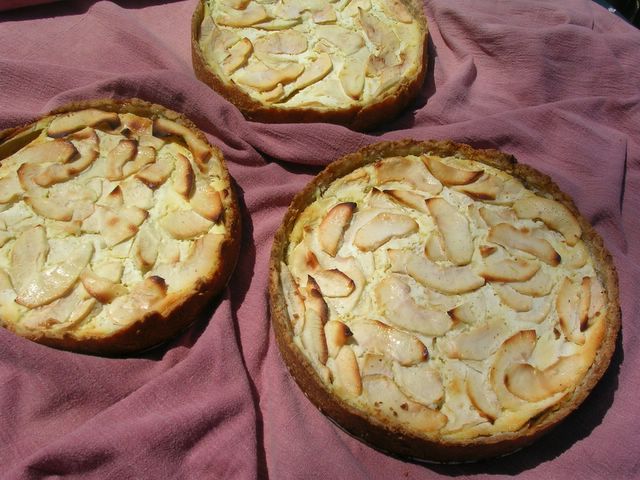
Ceyda will cook dinner for the mosque tomorrow, and I will help her and contribute dessert. When cooking for a crowd, it's always a good idea to do as much as you can in advance, so I spent several hours today baking 7 apple tortes for approximately 100 people. The recipe for the torte is from Breads by Cynthia Sheer of California Culinary Institute, a book I inherited many years ago from my sister-in-law. This is the kind of apple dessert that I love with lots of thin apple slices bound together with a minimum of batter. All good things come at a price, though, and in this case, preparation involved washing, quartering, coring, peeling and thinly slicing 2 big bags of McIntosh apples--a very tedious job even with Rana helping. I usually make a streusel topping for this torte, but this time I was lazy and baked them plain. The tortes are nicely wrapped and resting in the refrigerator now. I hope that they will taste even better the next day as most apple desserts do. Filling:
4 medium-sized tart cooking apples, peeled, cored and sliced 6 oz cream cheese, softened 2/3 c sugar 1 tsp vanilla extract 1/2 tsp grated lemon rind 1/4 tsp ground nutmeg 2 eggs 1/2 c half-and-half Pecan Press-In Pastry:
1 1/4 c flour 1/4 c finely ground pecans 1/3 c sugar 1/2 c cold butter, cut into pieces 1 egg yolk 1/2 tsp vanilla extract
Preheat oven to 400F. In medium bowl, mix flour, pecans and sugar. Cut in butter until crumbly. Beat egg yolk with vanilla. Stir egg mixture into flour mixture. (Mixing the eggyolk into the flour mixture is not easy. I almost always end up doing it with my hands to be able to get a uniform dough. That makes me wonder if it would be easier to start with softer butter and just to mix everything with an electric mixer. I have to try it one time to see the difference in texture.) Press dough together into a flattened ball. Press into bottom and halfway up sides of a 9-inch springform pan. Arrange apple slices evenly in prepared pastry shell.
In a medium bowl, beat cream cheese until fluffy; beat in sugar, vanilla, lemon rind and nutmeg. Add eggs, one at a time, beating well after each addition. Blend in half-and-half. Pour mixture over apples.
Bake in preheated oven until apples are tender, and pastry is well browned (45-55 minutes). Place pan on a wire rack. Cool before you remove the sides.
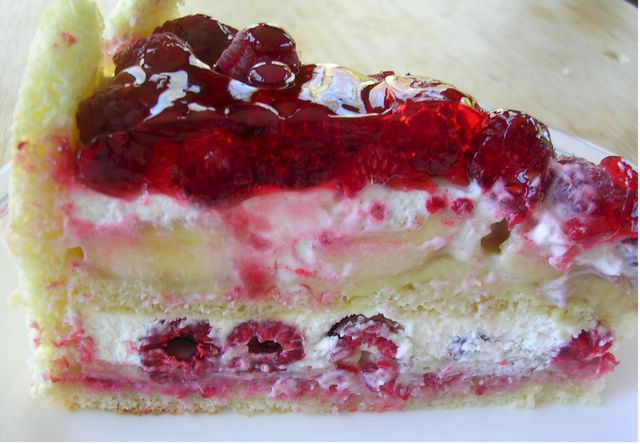
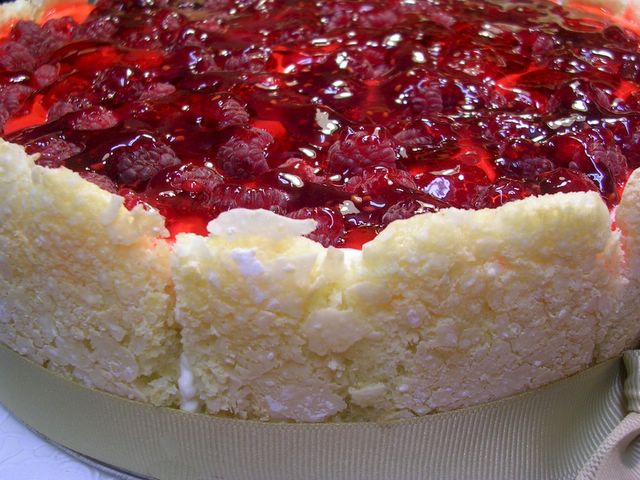
Inspired by Hatice, Elif, Mine, Dilek and Funda_Mete, I decided to try another charlotte recipe. It is not my first time making this dessert, but I always used store-bought ladyfingers before. Well, this time the supermarket didn't have any, and I ventured to make my own. The batter was not difficult to prepare, but I could not find my pastry bag, so I used--believe it or not--a ziplock bag to pipe it. The result looked terrible, but I put it in the oven anyway. I have to say that this batter is very forgiving. The ladyfingers came out of the oven looking much better than they went in. Another advantage to making my own batter was to be able to bake rounds eliminating the struggle to fit rectangles into a circle. The gelatin I used on the top to keep the fruit in place was too "red", and did not look good at all with the raspberries. But other than that (and the uneven look of some ladyfingers) the charlotte looked good and tasted incredible. I recommend this recipe (from Cocolat) wholeheartedly.
1/2 c sugar 1 tsp vanilla 2 ripe bananas 2 half-pint cartons fresh raspberries Ladyfingers to line sides of 8-inch springform plus 2 7-inch ladyfinger rounds 1 cup heavy cream Pastry Cream (recipe below)
Combine 1/3 c sugar with 1/4 c water in a small saucepan. Cover and bring to simmer. Simmer, covered, for 1 minute. Uncover and let cool. Add 1/2 tsp vanilla.
Slice bananas about 3/8-inch thick. Toss with vanilla syrup; set aside.
Crush enough raspberries to equal 2 tablespoonfuls. Sweeten with 1/4 teaspoon sugar; set aside.
Drain bananas and reserve syrup. Using a pastry brush, lightly moisten all inside surfaces of ladyfingers in the mold with the vanilla syrup. Spread crushed, sweetened berries in bottom of mold. Spread half of the pastry cream over crushed raspberries. Place a layer of whole raspberries over the pastry cream, using 3/4 cup of raspberries.
Whip cream with remaining 1 tablespoon sugar and 1/2 teaspoon vanilla until stiff but spreadable. Spread half the whipped cream over berries. Top with ladyfinger round; press gently to compact layers. Brush the ladyfinger round with vanilla syrup. Spread remaining pastry cream over it. Place banana slices all over pastry cream. Top with remaining whipped cream. Heap the remaining 1 1/4 cartons of berries on top of the whipped cream. Cover and chill dessert for 4-5 hours before unmolding.
Dessert may be completed and refrigerated 1 day ahead. Do not freeze. Remove sides, transfer to serving platter. Tie a ribbon around the finished dessert, if desired.
Pastry Cream:
After Fatima commented that the pastry cream turned too thick with the amounts given, I researched on pastry cream recipes, and decided to modify it as below. Many recipes also add 1 tbs of butter at the end to make the cream richer.
Sift together cornstarch, flour and sugar. Add egg yolks and whisk until pale and light.
Scald milk. Pour gradually on the yolk mixture, whisking constantly. Return to heat, and cook on medium heat, stirring constantly until custard thickens and starts to simmer. Simmer gently, still stirring all the time, for about 1 minute for flour to cook. Remove from heat. If lumpy like mine, strain immediately. Stir in vanilla. Let cool completely before using.
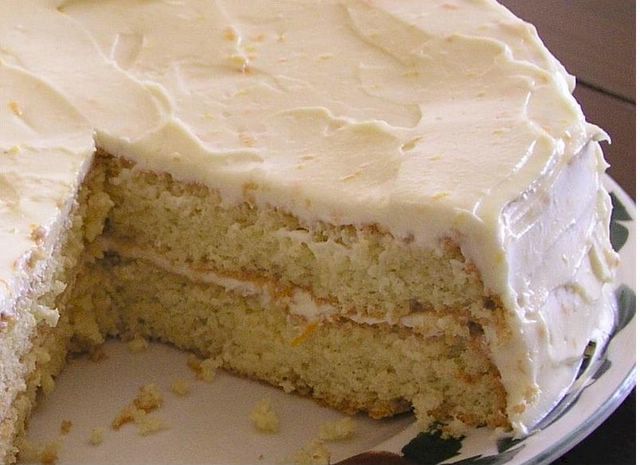
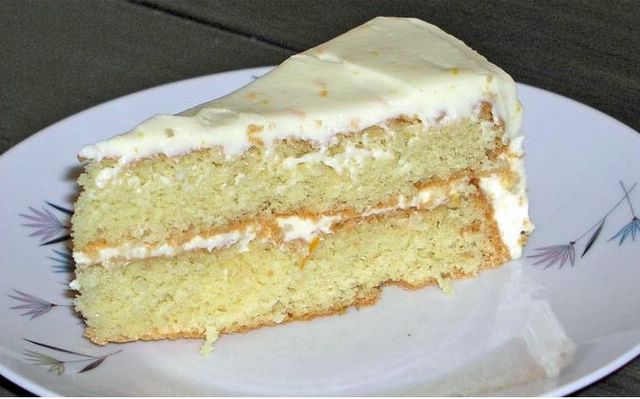
Lite Genoise Cake with Orange Cream Cheese Frosting
I always wanted to try this French classic. Evidently in the culinary institute baking a good genoise is a part of the curriculum for pastry chefs. I was nervous up until now to try one. I guess the mixing the eggs on the double boiler sounded a little complicated. But that wasn't as hard as I thought it would be. The last step of folding the flour into the mix without damaging the delicate foamy volume of the eggs was more difficult. I read two other versions of genoise after baking this one. One of them had vanilla extract or my favorite finely grated lemon or orange peel among the ingredients which I thought it would be a good idea to include. Because the cake lacks in flavor. The other recipe I came across suggested the butter should be added in last minute and the cake should be baked immediately after that. Otherwise the volume of the eggs can be affected negatively. Also the more butter used the denser the cake becomes.
Cake:
6 large eggs 1 c sugar 2 oz butter, melted (it should remain warm and liquid) 1 c cake flour, sifted 3 times
Preheat the oven to 350F. Adjust the rack to the center of the oven. Butter the bottoms only of 2 9-inch cake pans, line them with parchment paper, butter the parchment paper and dust with flour. (Alternatively, you can spray with pan spray.)
Combine the eggs and sugar in the bowl of your standing mixer (or a bowl) and place it in a saucepan of simmering water, being careful that the bottom of bowl does not touch the water. Insert a thermometer. Whisk continuously until the temperature reaches 110F, 3 to 4 minutes.
Remove from the heat and transfer the bowl to a standing mixer fitted with a whisk attachment, or use a hand mixer. Whip on high speed for 5 to 8 minutes, or until the eggs are three times their original volume, are thick and pale yellow in color, and form a ribbon when drizzled from a satula, Turn down the mixer to medium speed and whip for 2 minutes more. This stabilizes the foam. On low speed, stream the warm, melted butter into the batter and mix for 15 seconds until incorporated.
Add the flour to the foam all at once and fold it in carefully with a baloon whisk just until incorporated, maintaining as much of the foam as possible.
Pour the batter into the prepared pans. Tap each pan lightly on the table three times to eliminate the air bubbles. Then using the same jerking wrist action you would use to throw a Frisbee, swing each pan around the table so that the batter is forced up the sides of the pan. This will prevent a dome from forming in the middle of the cake.
Bake for 15 minutes. Switch the pans front to back and rotate them, then bake for 10-12 minutes more. Test the cake for doneness by lightly touching the top of it with a finger. The finger indentation should spring back right into place. If it doesn't bake for 5 to 10 minutes more. The cake is also done when it starts to pull away slightly from the sides of the pan.
Let cool in the pans on a rack for 15 minutes, then invert onto the rack, remove the pans and parchment, and cool for at least 2 hours before using. Genoise may also be ket at room temerature for u to 2 days or frozen for up to 2 weeks, wrapped airtight.
Orange Syrup:
1/2 c plus 1 tbs orange juice 3/4 c sugar
Bring the juice and sugar to a boil in a small saucepan over medium heat, stirring. Cook until the sugar has dissolved, about 3 minutes.
With a mixer cream the cream cheese and butter on a low speed for 4 minutes. When the mixture is smooth and lump free slowly add the powdered sugar. Beat for two minutes. Then add the orange zest, juice and vanilla. Mix to combine. The cream cheese frosting can be used right away or stored in the refrigerator for up to 3 days.
To assemble, sprinkle the layers with orange syrup. First spread some frosting in between the layers, then frost cake completely.
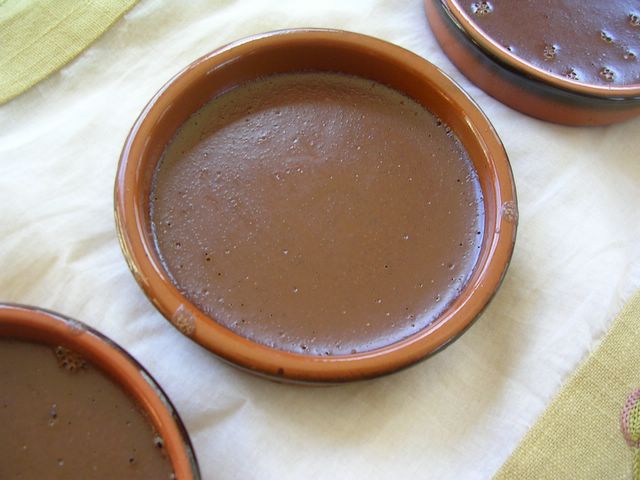
I bet that if you like Crème Brûlée, you will like this chocolate version even more. The combination of chocolate and caramel is heavenly in this recipe from Fran Bigelow's Pure Chocolate.
5 egg yolks 1/4 c sugar, plus an additional 6 tbs for caramelizing 2 c heavy cream 1/2 vanill bean, split lengthwise 4 1/2 oz bittersweet chocolate (preferably 70% cacao), finely chopped
Position a rack in the middle of the oven and preheat the oven to 300F. Have ready 6 7-oz shallow oval ramekins or crème brûlèe dishes.
In small bowl, combine the egg yolks with 2 tbs of the sugar. Gently whisk, without beating in air, until smooth and the sugar begins to dissolve. Set aside.
In a large saucepan, heat the cream with the split vanilla bean and 2 tbs sugar until it comes to a simmer. Remove from the heat. Lift out the vanilla bean and let cool a minute. Holding the bean over the cream, gently scrape loose all the seeds so they fall into the pot. Discard the empty pod or rinse and let dry for vanilla sugar. (Place the dried pod in a sugar canister.) Stir in the chocolate until thoroughly melted and smooth. (I had to turn on the heat again on low for chocolate to completely melt.)
Pour one third of the chocolate mixture into the egg mixture and stir to combine. Then add the remaining chocolate mixture, gently stirring until smooth. (Gently stirring is required not to beat air into the mixture resulting in air bubbles in the finished baked custard. To see the difference between custard with and without air bubbles, click here.) Strain the custard through a fine mesh sieve into a large measuring cup. Pour about 3 oz. into each ramekin, about 1/2 inch deep. Firmly tap the base of each cup on the counter to remove any bubbles.
Arrange the ramekins in a heavy-rimmed baking sheet or roasting pan. Put the baking dish into the oven and fill with 1/2 inch simmering water for a bain-marie.
Bake the custards for 10 minutes, or until set. The tops should be glossy. With a wide saptula, lift and transfer the custards to a rack to cool. Then transfer to the refrigerator to chill for 2 to 4 hours, uncovered.
Shortly before serving, sprinkle a tablespoon of sugar over each chilled custard. Use a propane or butane torch to caramelize the sugar. If you don't have a torch, you can achieve the same result by putting the ramekins under the broiler, positioned about 4 imches from the flame. Turn frequently to avoid burn spots. (I personally was never successful with this method. If you love creme brulee, it is a smart thing to invest in a hand-held torch. If you know your way around in your home improvement center, I believe you can get the kind plumbers' use for a very decent price.) Serve shortly after, because lenghty refrigeration after this stage will cause the caramel to weep.
Last Saturday, it was Mirsada's turn to cook for the dergah. Since I knew which dessert she would be making, I left home equipped with my camera. Unfortunately, I was late for dinner, and not only was there almost no dessert left by the time I arrived, but it was getting dark which made it difficult to take a decent picture of the few end pieces left. I am writing this because the picture above doesn't do any justice to Mirsada's dessert which was smooth, light, rich and crunchy--all in the same bite.
Mirsada gave me the recipe years ago, and I have been able to successfully make it several times--yet there have been other times that I failed, either in the cake or the buttercream. It reads like a simple recipe, but it can be mysteriously tricky at times. Mirsada, who has clearly mastered it, pointed out a few rules for success which I included in the recipe.
7 oz chocolate, cut into small pieces 2-3 tbs milk 1 tbs butter
First prepare the syrup. Mix all syrup ingredients together and bring to a boil. Reduce heat and simmer for a few minutes. Take off from heat and cool.
Grease and flour a 13x9-inch pan. Preheat oven to 350F. To prepare the cake, beat eggs and sugar until thick and light-colored. Add the cocoa and flour and mix well. Pour into the prepared pan. Bake until set and center springs back when gently touched. When warm, sprinkle with the sugar syrup.
For filling, mix some of the cold milk with flour. Stir until no lumps remain. (Mirsada said that the consistency of the mixture must be just a little thicker than crepe batter.) Heat the remaining milk with sugar and vanilla extract. When it starts to simmer, gradually and carefully pour in the flour mixture, stirring continuously. Continue to stir and cook until the mixture thickens, for about 10 minutes. Cool completely.
Exactly half an hour before you are ready to proceed with the next step, take out the butter sticks from the refrigerator. (This step is critical: if the butter is too soft, buttercream will not have the right consistency, if it is too firm, it may be difficult to incorporate it.) At the end of this period, cut butter into chunks. Add the chunks,a few at a time, to the cooled custard and beat with an electric mixer until they are completely incorporated. Continue until all butter is used up. Cover the buttercream and rest in the refrigerator for a couple of hours.
To assemble, spread the buttercream frosting on top of the cake layer. Cover and refrigerate as you prepare the chocolate topping. For the topping, melt chocolate pieces with butter on low heat. If too thick for spreading, you can lighten it with 2-3 tbs milk. Cool a few minutes. Spread as a thin layer on the buttercream.


