I had some leftover ricotta cheese from another project. Ordinarily, I would make one of my three favorite ricotta cheesecakes. (White Chocolate and Chestnut, Orange and Chocolate, Chocolate and Pecan.) But having posted those recipes already, I decided to look for another recipe in the Book of Cheesecakes by Steven Wheeler, and settled for this one after a short search. Instead of the golden raisins in the recipe, I substituted a combination of dried apricots, cranberries and currants. I also threw in some orange zest and nuts. Some of the strips of pastry that I placed on top for decoration drowned in the cheesecake batter; but otherwise, this turned out to be a good-looking, light and refreshing cheesecake --although no competition for my favorite trio mentioned above.
Sweet Shortcrust Pastry (recipe below)
1 1/2 lb ricotta (Mine was a little less, so I reduced everything accordingly)
2/3 c whipping cream
1/2 c sugar
1 tbs flour
3 eggs
2 tbs golden raisins (I substituted with mixed dried fruit)
1 tbs orange flower water (I used less)
Orange zest and/or nuts (if desired)
Preheat your oven to 400F. Grease a 9" springform pan. Roll Sweet Shortcrust pastry to 1/8" thickness. Line greased pan with dough. Set aside. For filling, beat ricotta, whipping cream, sugar, flour and eggs in a bowl. Stir in dried fruit, zest, nuts and orange flower water. Spoon filling into prepared dough. Decorate with strips of leftover pastry in a crisscross pattern. Bake in preheated oven for 20 minutes. Reduce oven to 350F and bake for 45 minutes more or until set. (I waited for pastry to brown, but that did not happen.) Cool before serving. You can brush the top with a glaze and decorate the cheesecake with candied orange peel and/or sliced almonds if desired.
Sweet Shortcrust Pastry:
1 3/4 c flour
2 tbs powdered sugar
1/2 c cold butter, cut into pieces
1 egg
1/2 tsp vanilla extract
Sift flour and powdered sugar into a bowl. Add the chunks of butter and cut them into flour with a pastry blender. (Alternatively, you can use the food processor for this.) Add egg and vanilla. Stir with a fork until dough forms. Shape it into a log, wrap in plastic and refrigerate for an hour before you roll. Can be stored in the refrigerator for up to 4 days or frozen up to 6 weeks.
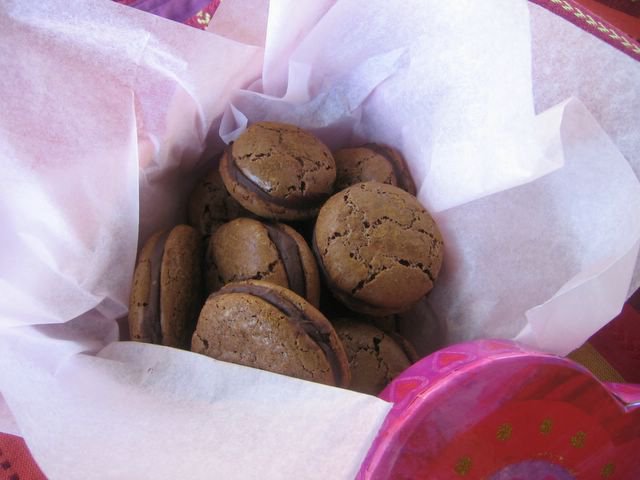
So far, I've tried Pierre Herme's, David Lebovitz's and Fran Bigelow's chocolate macaron recipes as well as Clement's basic and Nigella Lawson's pistachio macaron recipes. That makes 6 batches of "footless" macarons. Of these, nonchocolate ones turned out to be real disasters, and the chocolate ones were acceptable with varying degrees of unsuccess. David Lebovitz's recipe definitely deserves a second try with a lighter hand on the mixer and shorter baking time; it was only with his recipe that my macarons sported something -- which I will have to stop short of calling "feet". But they were definitely overbaked to the point that my son called them Rock Macarons.
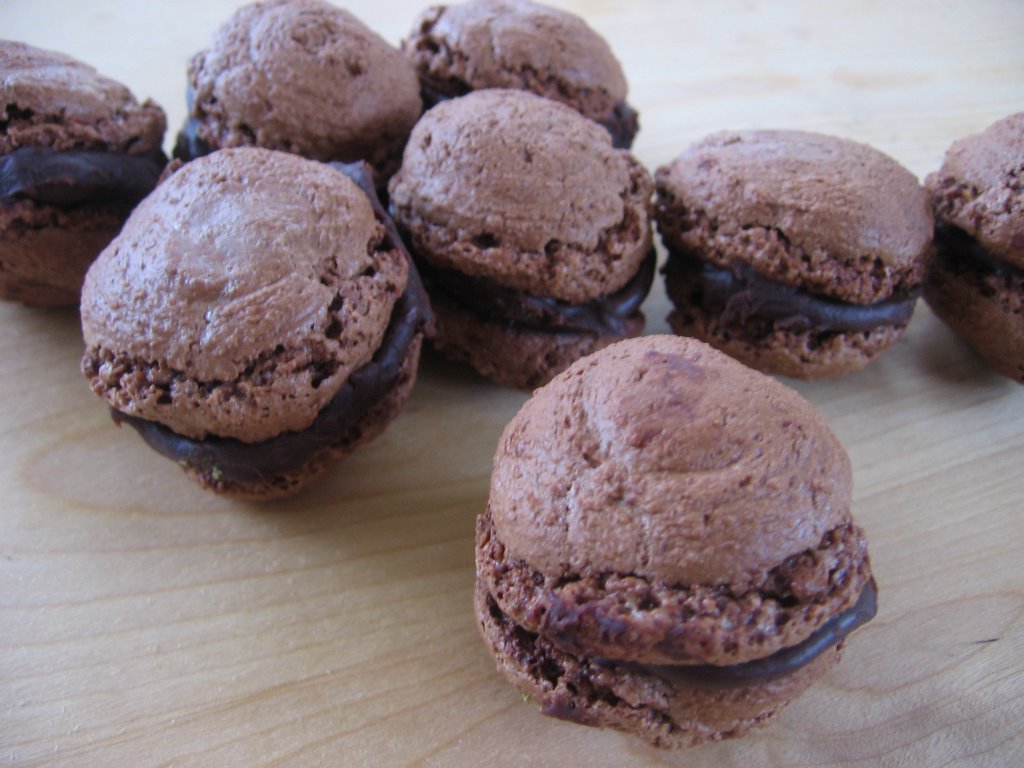
The last recipe I tried before I ran out of almond flour was Fran Bigelow's Chocolate Macarons from Pure Chocolate. I was not aware that she had a macaron recipe in that book; it came as a pleasant surprise. Her recipe was a little untraditional since it called for a combination of almond paste and flour, and the egg whites were whipped together with the other ingredients. Not surprisingly, those macarons turned out to be rich in almond flavor. I piped them larger than the previous ones and when they came out of the oven, they had the required flat tops but alas, still no feet! (I am seriously starting to envy those lucky people who get them right the first time. Is there some magic involved here that I am missing?) Tastewise, although all of them were delicious in their own way, I have to give to Pierre Herme's chocolate macarons the first prize. You know, it just occured to me that my Trader Joe's almond flour might have been too coarse. That may be why I was never able to get those smooth and shiny tops. I guess I'll order more almond flour from L'Epicerie and give these recipes another try...
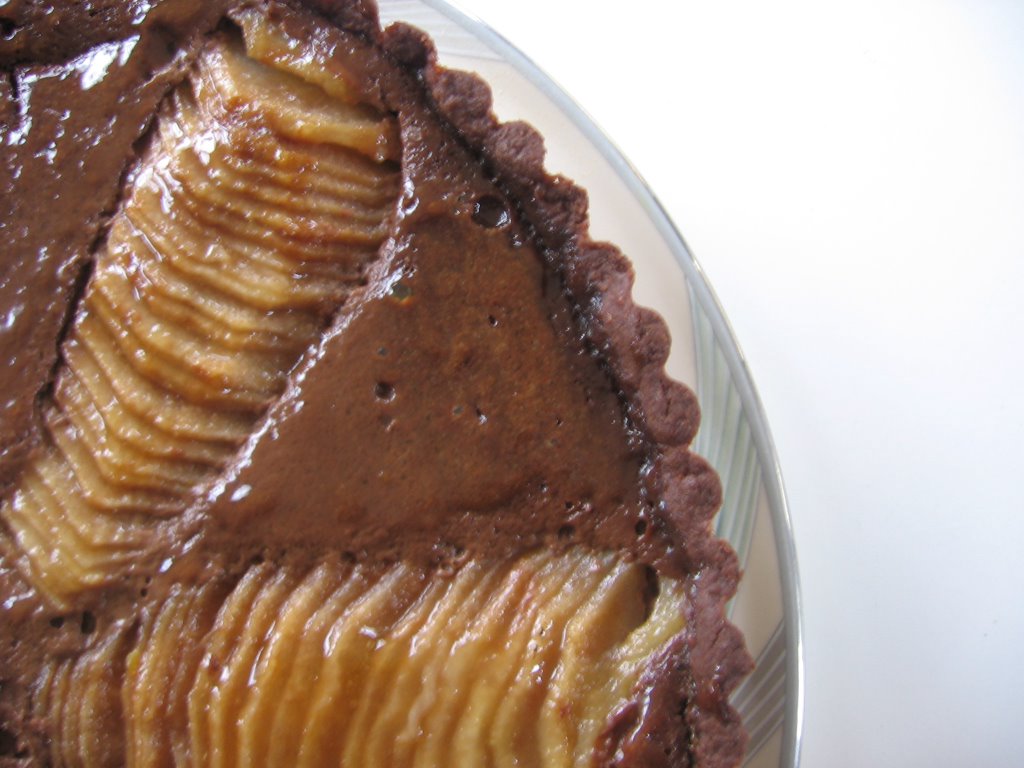
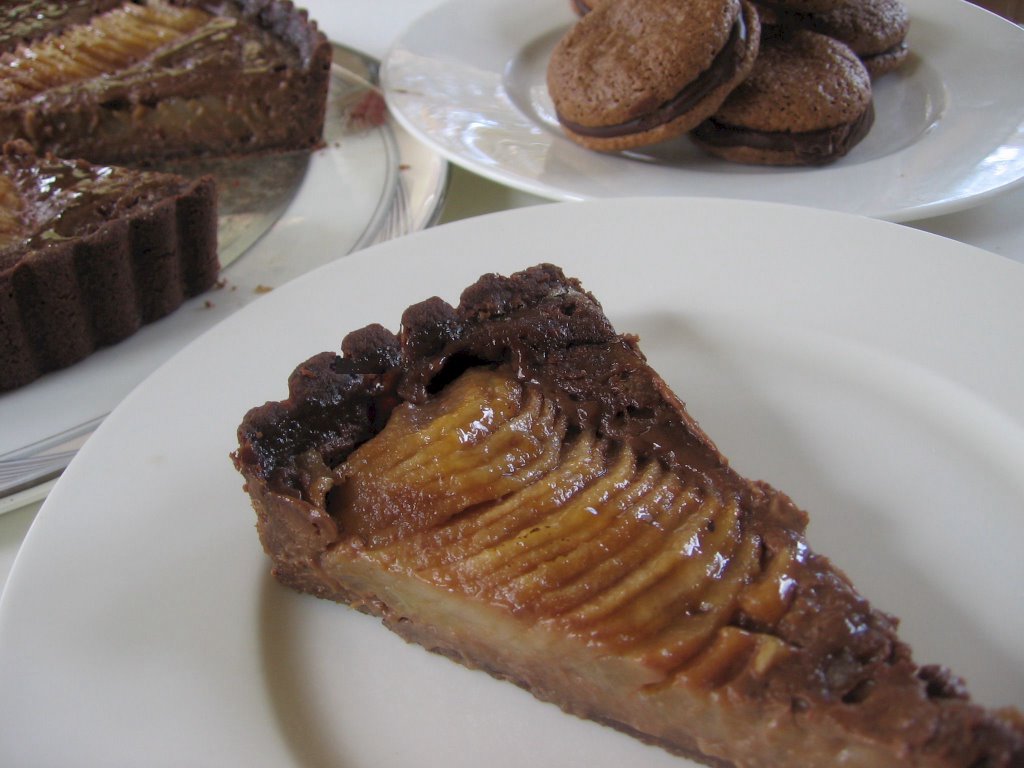
After repeated unsuccessful results with chocolate macarons, I had to try my hand at something different. (The truth is I ran out of almond flour after the 6th batch.) I bought pears in bulk last week, and we ended up eating a lot of them. Since nobody seemed to be interested in the last 3 anymore, I decided to make a Pear and Chocolate Cream Tart from Simple Tarts by Elizabeth Wolf-Cohen. Although I love to bake with fruits, I do not necessarily like to combine them with chocolate. (Nuts yes, but fruits no, except in some exceptional cases like raspberries.) I was a little skeptical about this combination which I was trying for the very first time, but the result was pleasing. The pears melted nicely into the chocolate ganache filling, and the chocolate cookie crust added a nice crunchy component. I have to say that this tart is not photogenic at all; it looked better than in the pictures. By the way, I forgot to tap the tart on the counter it before I put it in the oven, hence the craters you see in the pictures.
The only difficulty I encountered with this recipe was the chocolate pastry which was crumbly and difficult to roll. This is the second time I am making this crust and I had the same problem the first time as well. I ended up pressing it in the tart pan and it baked to a delicious chocolate cookie-like crust. I really hope I can figure out what I am doing wrong with this so that I can use it more in the future.
Preheat the oven to 375F. In a saucepan, bring the cream and 2 tbs of the sugar to a simmer. Turn off the heat and add the chopped chocolate. Stir until smooth. Cool slightly. Now add the egg, egg yolk and vanilla, and stir until just blended. Spread the filling evenly in the tart shell. Set on a baking sheet for easier handling.
Peel, halve and core the pears. Put them cut-side down on a work surface and cut crosswise into thin slices. Arrange them on the tart shell and press gently with the heel of your hand to fan out the pear slices towards the center. (I find it easier to fan them in my hand before I arrange them on the tart.) Tap the tart gently on your work surface to eliminate air bubbles. Bake for 10 minutes. Reduce the oven temperature to 350F. Sprinkle the surface with the remaining 2 tbs sugar and bake until the custard is set and the pears are tender and glazed, about 20 minutes more. Cool slightly and serve warm.
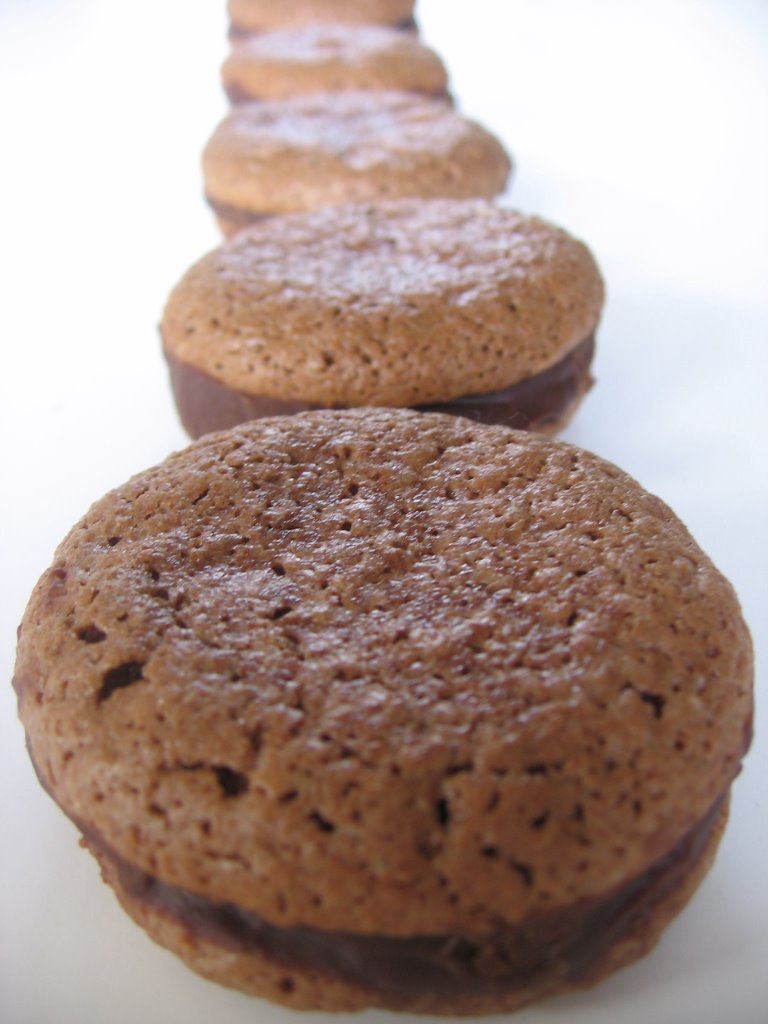
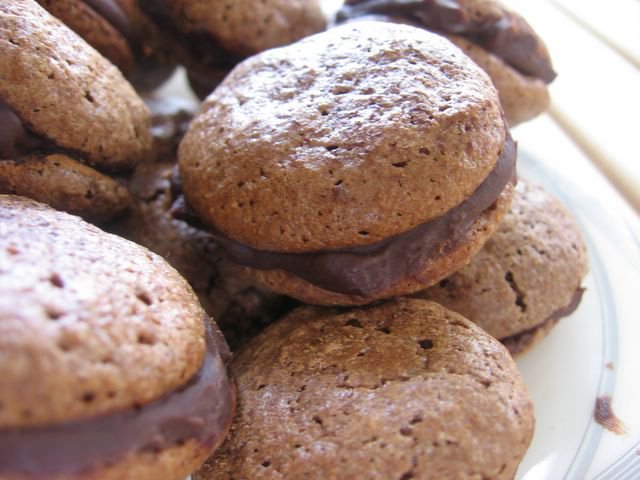
Macarons have been on my ever-growing list of have-to-bakes for quite a while before I finally got my hands dirty last week and tried the Chocolate Macaron recipe from Pierre Herme's Chocolate Desserts. Since I had not eaten macarons before, I did not have any expectations concerning the taste. But I had a fairly good idea as to how they should look. That's why I was quite dissapointed to see the cracked tops and flat bottoms of my macarons as they came out of the oven. Although they lacked the characteristics of a succesful macaron, I did not want to waste them; so, I made the ganache filling and sandwiched them with it. As the recipe called for overnight refrigeration, in they went the refrigerator for their beauty sleep. When I tasted one the next morning, I was immediately convinced that this was one of the most sophisticated chocolate desserts I have ever had; it was creamy, crunchy and chewy all in one bite. I was hooked on the taste, but what was I to do about the looks? Not surprisingly, the macarons disappeared fast and I was able to prepare the second batch the same evening. This time, I used stacked oven trays as Pierre Herme suggested, and ended up with smoother tops --mind you, not flat and shiny as I would've loved them to be, but just less cracked. The frilly bottoms called "feet" were still missing. I spent that night reading the egullet thread on macarons from the first page to the last, and learnt a few things I missed on the first two tries. Meanwhile, my third batch of macarons using Nigella Lawson's Pistachio Macaron recipe (I found in the egullet macaron thread) turned out to be a total disaster. The cookies were edible, but they were as far a cry from a macaron as a cookie could possibly be. Needless to say, I did not bother to make the pistachio buttercream filling. I just sandwiched them with Nutella and my forgiving kids ate them. As I write these, the egg whites for the fourth batch are resting uncovered on the counter. I will make the macarons tomorrow morning and wait until they develop a crust before I bake them. I understand that this can take anywhere from 10 minutes to several days. After the baking, cooling and sandwiching phases, I'll wrap and refrigerate them overnight for flavors and textures to blend. If nothing else, baking macarons is a good exercise in patience. I hope to have better luck tomorrow with the fourth batch so that I can share the recipe with you. In the mean time, I leave you with the pictures of my footless and cracked-top macaron want-to-be's.

 I had some leftover ricotta cheese from another project. Ordinarily, I would make one of my three favorite ricotta cheesecakes. (White Chocolate and Chestnut, Orange and Chocolate, Chocolate and Pecan.) But having posted those recipes already, I decided to look for another recipe in the Book of Cheesecakes by Steven Wheeler, and settled for this one after a short search. Instead of the golden raisins in the recipe, I substituted a combination of dried apricots, cranberries and currants. I also threw in some orange zest and nuts. Some of the strips of pastry that I placed on top for decoration drowned in the cheesecake batter; but otherwise, this turned out to be a good-looking, light and refreshing cheesecake --although no competition for my favorite trio mentioned above.


