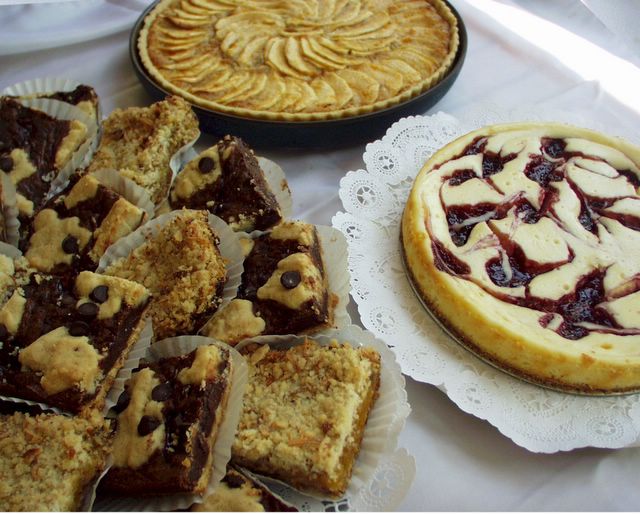
Normandy Apple Tart, White Chocolate Raspberry Swirl Cheesecake, Apricot Dessert Bars and Chocolatey Raspberry Crumb Bars
The month of May is always very busy for us because of the children's hectic school activities. Year-end music and orchestra concerts, the Music Festival, baseball and softball games and practices, and class trip preparations are all packed into the 2nd half of May. This Saturday, Zeynep's class will put on a Talent Show complete with food and drinks, skits, singing, dancing, and many other performances. (Zeynep will play the Moonlight Sonata on the piano.) The proceeds will go towards their class trip which will take place in early June. Some time ago, Zeynep and I made a commitment to bake for the Talent Show. Usually, a group of Zeynep's friends will come to our house and do the work on such occasions, and all that I have to do is to supervise them. However, this is such a busy time of the year that it was difficult to arrange for that, so Zeynep and I decided to do it on our own after she comes home from school today. Add to that the ongoing wedding cake baking, and you can see that it will be a busy day in my kitchen. (I baked the 2nd half of the 10" cake last night, and I hope to bake the 1st half of the 12" cake today.) I am writing this in the morning still undecided about what to bake for the Talent Show. I will post it after I add the recipes and the pictures later in the day.
Normandy Apple Tart
This is from my recipe book which means that I will not be able to provide a source. I substituted my own crust recipe, and changed a few other things so that I can call it my own.
1 11-inch pie crust (Follow Ceyda's pie crust recipe with 1 1/3 c flour and 8 tbs butter) 8 tbs butter, softened 1/2 c sugar 3 egg yolks 2 tbs whipping cream 1 1/4 c finely ground almonds 1 tsp vanilla 1 tsp almond extract 2-3 peeled, cored and thinly sliced apples 1 tbs apricot preserves (optional)
Roll and fit the pastry into an 11-inch pie pan. Beat butter and sugar until light and fluffy. Add the egg yolks, one at a time, beating after each addition. Now add the whipping cream, ground almonds, vanilla and almond extract. Mix it well. Spread the almond filling on the crust. Arrange the apples decoratively on the almond filling. Bake at 375F until the filling seems set and the apples are lightly browned. If desired, brush with warmed, strained apricot preserves for a glaze.
White Chocolate Raspberry Swirl Cheesecake
The batter for this cheesecake tasted great, but I do not know how it tasted after it was baked, maybe Zeynep will report back later tonight. It was a bad idea to put raspberry preserves on top, because it caused this "crater" look. Next time I make it, I will put the preserves in between two layers of cheesecake batter. This cheesecake may be very good served with Rose's raspberry sauce.
1 c finely ground vanilla wafers 1/4 c butter, melted 2 8 oz. cream cheese, softened 1/3 c sugar 2 eggs 1/2 tsp vanilla 3 oz white chocolate, cut in samll pieces. 1/4 c raspberry preserves
Preheat the oven to 350F. Combine melted butter with ground vanilla wafers; stir well until you obtain a uniform mixture. Press this to the bottom of 9-inch springform pan. Melt white chocolate in a pan suspended over simmering water, leave to cool a little bit. Beat cream cheese and sugar until well combined. Add the eggs, one at a time, beating after each addition. Now add the cooled white chocolate and vanilla, and beat shortly until the batter comes together. Pour into the prepared springform pan. Warm the preserves shortly for easier swirling. Spoon teaspoons of it on top of the cheesecake batter. Swirl gently with a skewer. Bake until edges are set but the center is still slightly jiggly.
Chocolatey Raspberry Crumb Bars
We made these bars for an earlier class event with Zeynep's friends. They loved the chocolatey taste so much that we have been making them over and over again. The recipe is from a Nestle cookbook.
1 c (2 sticks) butter, softened 2 c flour 1/2 c packed brown sugar 1/4 tsp salt 2 c (12 oz) chocolate chips (divided) 1 can (14 oz) sweetened condensed milk 1/2 c chopped nuts (optional; we did not use it)1/3 c seedless raspberry jam
Preheat oven to 350F. Grease 13"x9" baking pan. Beat butter until creamy. Beat in flour, brown sugar and salt until crumbly. With floured fingers, press 1 3/4 c crumb mixture onto bottom of prepared baking pan; reserve remaining mixture. Bake for 10-12 minutes or until edges are golden brown.
Combine 1 c chocolate chips and condensed milk. Warm over low heat, stirring until smooth. Spread over hot crust.
Stir nuts into reserved crumb mixture; sprinkle over chocolate filling. Drop jam by rounded teaspoon over crumb mixture. Sprinkle with remaining chips. (We used much less than a cup.) Bake for 25-30 min or until center is set. Cool in pan on wire rack. Cut into bars.
Amina's cake will be a 4-tiered (12"-10"-8"-6") white butter cake. Since this may not be enough for the crowd we are expecting, there will be one or two undecorated 13"x9" cakes in the kitchen for backup. Every tier will have 4 layers. I am planning to use 2 different flavors of Neoclassic buttercream to frost in between the layers: raspberry and lemon. The outside will be frosted by White Chocolate Cream Cheese buttercream. There are a number of reasons for using 2 different kinds of buttercream. First of all, I am afraid that my Neoclassic buttercream may turn more buttery than creamy. In case this does happen, the flavors of raspberry and lemon will mask the buttery taste. Also, if the weather is very hot that day, the Neoclassic (which is mostly butter and quite prone to melting) will probably perform better inside the cake than the outside. Therefore, it is a good choice for in between the layers. A second frosting is always welcome to the palate, and the white chocolate inside the White Chocolate Cream Cheese frosting will complement the raspberry and lemon flavors inside very nicely. This buttercream has a light taste since it is sweetened only with white chocolate, it is the right consistency for piping decorations, and most importantly, I believe that it will withstand the high temperatures better than the Neoclassic buttercream.
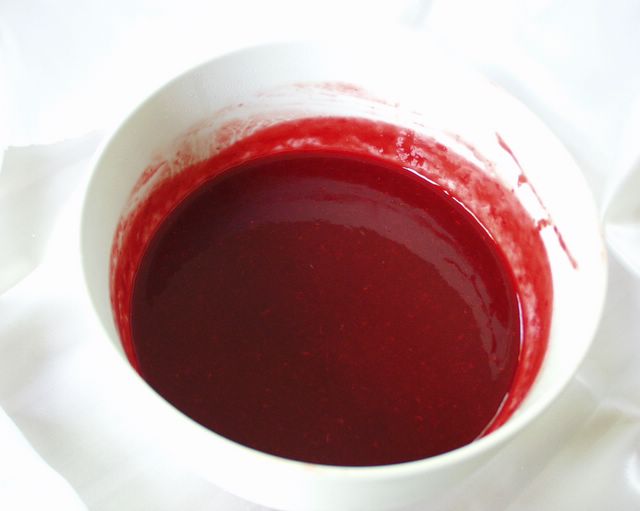
Let me come back to the real topic of this post. I did not bake yesterday but I made the Lightly Sweetened Raspberry Sauce from the Cake Bible, which I will use to flavor the raspberry buttercream. Rose Beranbaum, the author of the Cake Bible, says that this tart, intensely flavored puree is ideal to temper the sweetness of buttercreams. It is so concentrated that it scarcely effects the consistency of the buttercream base. She goes on to say that this is the purest raspberry flavor of any frosting she has ever experienced.
Emboldened by the fact that I made this sauce several times before, I relied on my memory as I made it this time, and I ended up with a more diluted version, which just won't do to flavor the buttercream. A second batch is in the works as I write these, and since I do not want to waste what I already made, I am wondering if I can use it as a dessert sauce next to the cake. Picture a tall slice of cake atop some raspberry sauce. What do you think, is it too much?
Here is the recipe without further ado:
2 12-oz bags of frozen unsweetened raspberries 2 tsp lemon juice 2/3 c sugar (optional)
In a strainer suspended over a deep bowl, thaw the raspberries completely. This will take several hours. (To speed thawing, place in an owen with a pilot light.) Press the berries to force out all the juice. There should be 1 cup.
In a saucepan boil the juice until reduced to 1/4 cup. (You can also do this in a microwave on high power. If you do so, make sure that you use a big enough heatproof glass measure or bowl to allow for bubbling.) Pour it into a lightly oiled heatproof cup.
Puree the raspberries and sieve them with a food mill with a fine disc. Or use a fine strainer to remove all the seeds. (This part is really time consuming.) You should have 1 liquid cup of puree. Stir in the raspberry syrup and lemon juice. Measure again, there should be 1 1/3 liquid cups. If you have less, add less sugar. The correct amount of sugar 1/2 the volume of the puree. Stir until sugar dissolves.
This can be refrigerated for 10 days, and frozen for a year. The puree can be thawed briefly and refrozen several times with no ill effect.
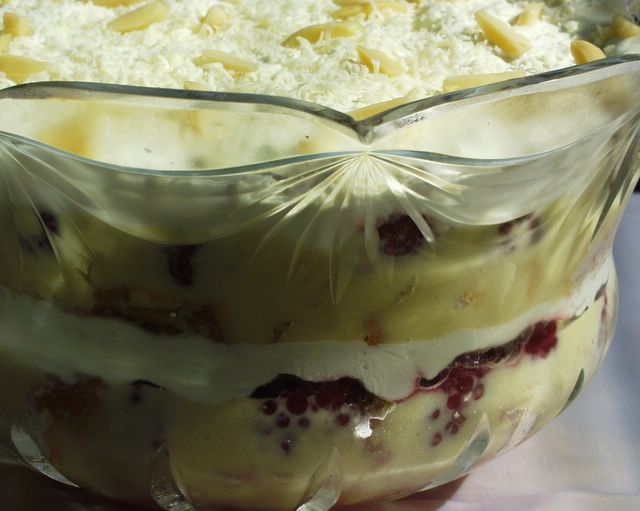
Thanks to my latest kitchen disaster, I had lots of yellow butter cake in bits and pieces at my disposal. So I decided to take a one-day break from baking in order to recycle all my leftover cake and to serve it in a new guise. A trifle fit the bill just right because I could also use my leftover egg yolks to make the pastry cream. (Unbroken yolks will not dry out if you store them submerged in water.) Wikipedia defines the trifle as a British dessert dish made from a mixture of thick custard, fruit, sponge cake, jelly/jello and whipped cream. This is a loose definition leaving ample room for you to put your creativity into action; you can use ladyfingers, whole or crushed cookies, different fruit combinations, fruit puree, jam, nuts, mascarpone, lemon curd... The possibilities are endless. Just make sure that you serve it in a beautiful glass bowl or individual glass stemware, because the look of the colorful layers is as appealing as the taste.
(By the way, Rana ran off with my camera's card, and until we find or replace it, I will have to use our old camera for pictures. Please bear with me!)
Pastry Cream with 6 egg yolks 1 1/2 c heavy cream 1 16-oz jar of blackberries in light syrup About 3 c of yellow butter cake cubes and crumbs Grated white chocolate and nuts to decorate
Sieve the blackberries; reserve the syrup and place the fruit on a paper towel to dry. Line an attractive glass bowl with half of the cake cubes. Sprinkle generously with some reserved blackberry syrup. Pour half of the pastry cream on top of the cubes, and top with half of the blackberries. Whip the cream with a little sugar. Spread half of it on top of the blackberries. Repeat the layers finishing with whipped cream on top. Decorate as desired. Refrigerate for a couple of hours for flavors to mature. Enjoy!
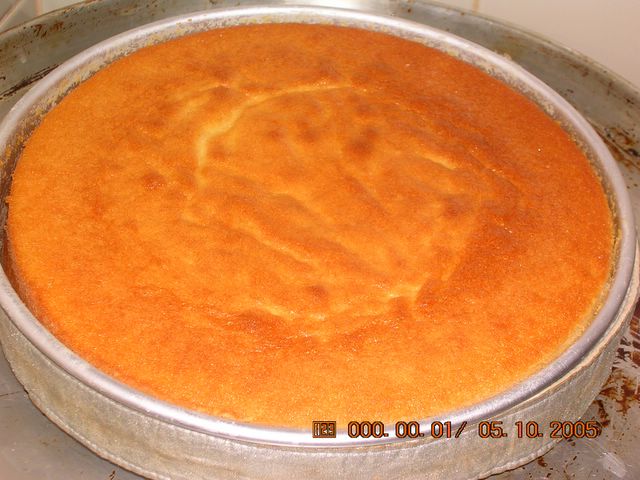
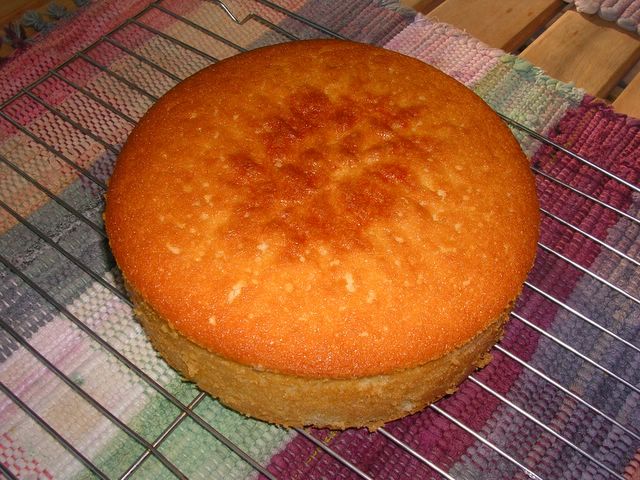
I baked the 10-inch cake tonight, and I am very happy to say that the modified recipe worked for this size, too. The picture below shows the cake cooling in its pan. The gray strip you see in the picture around the pan is called a magistrip and it helps the cake to rise uniformly with an almost flat top. If not, the top portion has to be cut and the cake is leveled.
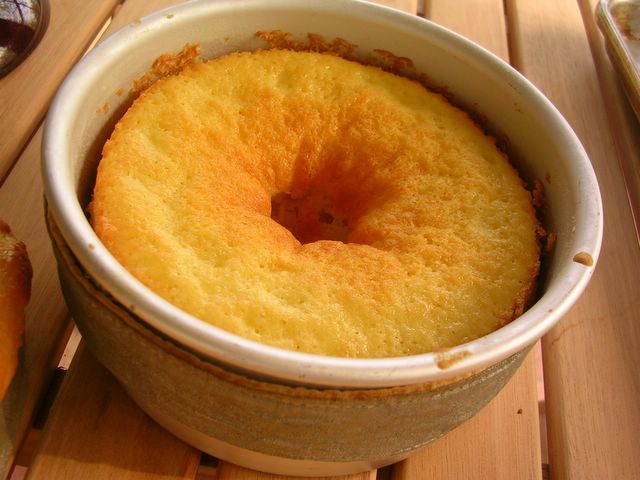
The second picture is of the 6-inch cake, my very first one that did not fall. This cake was cause for much joy and celebration in our house, but if you look carefully, you will see that its top was not level, therefore I had to trim it before I wrapped it airtight and placed it in the freezer.
When I ran into repeated problems baking even the smallest 6-inch cake, I went back to the pictures of my last tiered cake to convince myself that these recipes indeed worked. The above picture was taken 4 years ago, and shows Zeynep decorating the cake made for the graduating class of 2001 of her school. Zooming back to yesterday, thanks to my newly acquired oven thermometer, I was able to confirm that my oven temperature is precise. I also realized that I have been using more leavening than necessary in my baking, which might partially explain why I have experienced slightly fallen centers in Wendy's Secret Banana Cake and the Gateau Chocolat Pistache, not to mention the more recent disaster of the Yellow Butter Cake. However, in the latter case, decreasing the baking powder did not eliminate the fallen centers. What finally brought relief was a careless mistake (or was it?). When I saw that I was running out of eggs, I decided to try the White Butter Cake because I had many leftover egg whites from my unsuccesful attempts of the Yellow Butter Cake. While I was preparing the batter, I accidentally used double the amount of egg whites--which I did not know at the time--and to my surprise, the cake rose beautifully, leveled and stayed there! Using the altered recipe, I was able to bake 2 6-inch layers and 2 8-inch layers without any problems. I really do not know why these recipes worked for me 4 years ago and why they won't work without a modification today, but I am too tired tonight to even wonder. I am just very grateful for the help I received in such an unexpected way.
Here is the base recipe for white butter cakes from the Cake Bible:
1 1/2 large egg whites (I used 3 large egg whites, instead) 1/3 c milk 3/4 tsp vanilla 1 c sifted cake flour 1/2 c sugar 1 1/2 tsp baking powder (The increase in the amount of leavening is not linear for larger size cake pans; Rose has a lookup table for that) 1/4 tsp salt 4 tbs softened unsalted butter
Preheat the oven to 350F. To prepare the pan, generously grease the bottom and the sides, place a precut-to-size parchment circle at the bottom, grease the parchment circle, and finally sprinkle the whole inside with flour. In a medium bowl, lightly combine the egg whites, 1/4 of the milk and vanilla. In a large mixing bowl, combine all the dry ingredients and mix on low speed for 1 minute to blend. Add the butter and the remaining milk. Mix on low speed until the dry ingredients are moistened. Beat at high speed for 1 1/2 minutes to aerate and develop the cake's structure. Scrape down the sides.
Gradually beat in the egg mixture in 3 batches, beating for 20 seconds after each addition to incorporate the ingredients and strenghten the structure. Scrape the batter into the prepared pan (6-inch in this case), smooth with a spatula. Bake for 25-35 minutes for a 6-inch pan or until a test skewer inserted near the center comes out clean and the cake springs back when pressed lightly in the center.
My Latest Kitchen Disaster and My Newest Kitchen Gadgets
Last Saturday, I finally started baking for Amina and Murat's wedding cake. I used the Yellow Butter Cake recipe from the Cake Bible which I made with success many times before (although I have to say that my last try was several years ago). While it is not fun writing about my very unsuccessful experience, I thought that this is something I should include in this blog since it may help some of you to avoid a few disasters of your own, or maybe just remind you that you are not alone when you have a less-than-satisfactory kitchen experience.
My first try was with 2 6-inch cakes, and the batter first raised up really high, and then fell all the way down. The cakes did not have the fine texture typical of a good butter cake but were quite large-grained. When I researched in the Cake Bible, I found out that a fallen center and a coarse texture in a butter cake can be due to three reasons (listed in the order of importance): a cooler-than-required oven temperature, too much baking powder, and underbeating of the batter. I eliminated the last possible cause since I had timed myself well during preparation, and prepared the batter again, this time for 2 8-inch layers. Since I thought that the culprit was the baking powder, I decreased it. The result was fallen cakes again, maybe not as badly fallen as the previous batch, but fallen all the same. For the third batch, I used my old jar of baking powder and decided to give our 2nd oven downstairs a try. I knew that it was not a good idea to make two changes simultaneously, but I felt that I was running out of time since we had plans for the evening. I made the batter for 2 6-inch cakes and whisked the pans downstairs. When I opened the oven door half an hour later, I saw that one pan had overflowed a little bit and then fallen, and the other one had fallen so badly that you might have thought it was baked in a bundt pan instead of a regular one. At this point, I had to wrap up my baking project to go upstairs to do the mountain of dishes, and clean up my kitchen. I took some of the cakes to the mosque where the kids ate them. Some of my friends said that it was the evil eye, and they prayed for me, my future cakes and the couple-to-be. And today I bought myself an oven thermometer and a set of measuring spoons (which I never felt the need to use until now). Armed as such both spiritually and physically, I will attack the butter cake once again, and will share the outcome with you, be it good or bad.
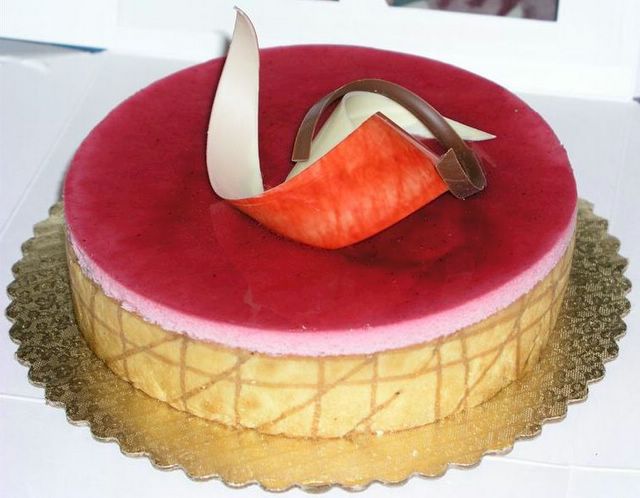
Knowing that Ceyda has a weakness for chocolate raspberry cakes, Paul family celebrated her birthday and mother's day with this work-of-art of a cake from their local French Patisserie. Many happy returns, Ceyda! Bon Appetit, Inc. The French Cafe & Bakery 180 Franklin Tpke Mahwah, NJ (201) 512 1144