Saturday, August 20, 2005

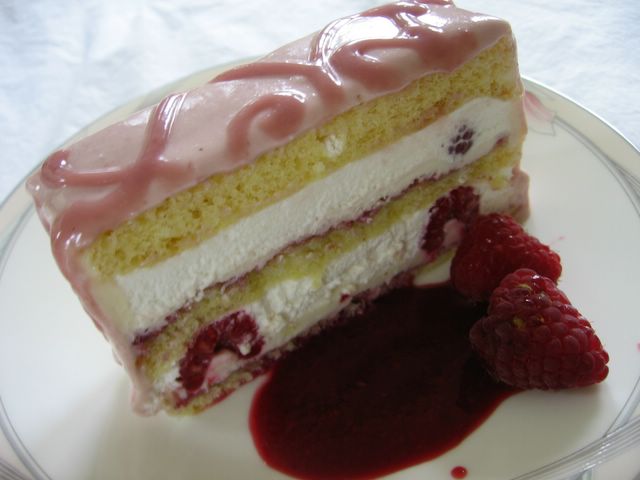
A Romantic Cake with Raspberries


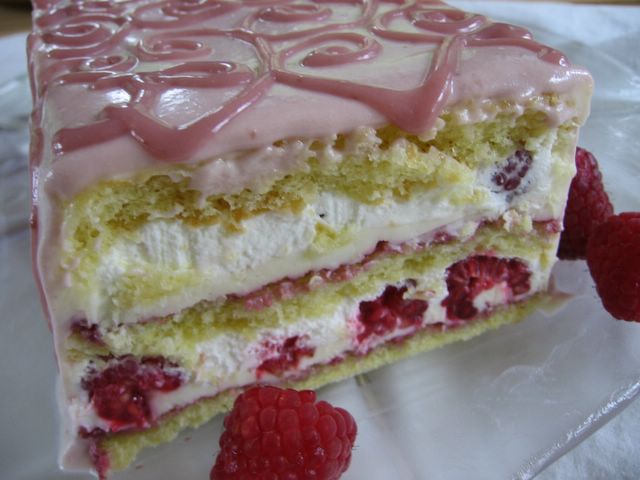
What motivated me to make this cake was a memory. I wanted to make a raspberry cake that looked and tasted like the
Frambuaz of Divan Patisserie in Turkey. In particular, I was after that pink raspberry glaze to cover the cake. The result was not what I had hoped for, but nevertheless a beautiful--if overly romantic--cake with a distinctive raspberry taste. However, my pursuit is by no means over; I still crave for that seamless-looking pink glaze and I do have a few other ideas to achieve it.

I tried something new with this cake. I used two different frostings (on top of each other) between the layers. I don't know if this is something done, or if I am the first person to try it, but I must say that it really worked well. The first frosting was a white chocolate and cream cheese buttercream. I spread it thin and stood the raspberries on it. I then filled in between the berries with slightly sweetened whipped cream. There was a visual contrast between the creaminess of the buttercream and the whiteness of the whipped cream; subtle but still there for the careful observer. On the other hand, there was no missing the tartness of the cream cheese buttercream against the sweetness of the whipped cream. Add to that the juicy raspberries and the golden sponge layers, and you have got yourself a dessert with a memorably complex taste. I do not think that it would be the same had I just mixed the two frostings.


Cut the cooled sponge layer into 4 13"x4.5" strips. (You will only need 3 of these; wrap and freeze the 4th.) Put one strip on a serving plate. Spoon some raspberry sauce to cover. Top with a thin layer of white chocolate cream cheese buttercream. Stand half of the raspberries on the buttercream layer. Add 2 tbs sugar and 1 tsp vanilla to 1 1/4 c cream and whip until fairly thick. Use half of the whipped cream to fill in between the raspberries. The whipped cream layer should be flush with the tops of the raspberries. Now top this with the second sponge strip and press down gently to level layers and fill up empty spaces with frosting. Repeat with buttercream, raspberries and whipped cream. Place the last sponge strip on top. Once again, press to level the cake and use whatever is left of the buttercream to crumb-coat the cake. (This thin layer of buttercream will provide a smooth, crumb-free surface for the final glaze/frosting.) Refrigerate as you prepare the Raspberry Ganache.

(From this point on, my instructions get a little sketchy as I added a little bit of this and a little bit of that without precisely measuring. But as I said before, I will work more on this and I promise to rewrite this part when I am really happy with the results. This first try turned out to be a frosting rather than a glaze. Also, it was a little too sweet for my taste, probably because the amount of raspberry sauce to tint it a light pink was not enough to offset the sweetness of the white chocolate.)

Whip 1/2 c of cream until thick. Add spoonfuls of raspberry ganache to the whipped cream until you obtain the desired shade of pink. Make sure, on the other hand, that your mixture is not too thin to spread on the cake. Use this to frost the outside of the cake. Pipe designs on the cake with the remaining raspberry ganache. Refrigerate at least for a few hours before you serve.

Raspberry Ganache

You may have leftovers from this. The Ganache becomes much thicker on standing.

Heat the cream and raspberry sauce until bubbly. Turn off the heat. Put the white chocolate pieces in the cream and stir until melted. Cool.


Wednesday, August 17, 2005

Experimenting with Matcha

Green Tea-ramisu


This recipe is from The Scent of Green Bananas. I did not have the right serving plate for this, so I made 4 individual servings in cups as well as a bigger dessert in a pie pan. In retrospect, I think that I should have made the tea stronger. I have preciously little matcha left now. As soon as I receive my new stock, I'll try again with more layers and stronger matcha flavor.

Matcha Sherbet


I did not really mean to make a sherbet. I wanted to make green tea ice cream. But when, for some unknown reason, our ice cream machine did not cooperate and failed to freeze properly, I had to put the slightly thickened ice cream mixture in the freezer. I stirred it twice in the following couple of hours. What we ended up with was a matcha sherbet; tasty yes, but still leaving us wanting for that smooth ice cream experience. If I can make good matcha ice cream next time, I will put it into individual serving plates, cover with Italian meringue and fire with my kitchen torch. I am hoping to please Zeynep with this, because I think it will remind her of the tempura ice cream they serve in Japanese restaurants--her very favorite dessert.

Monday, August 15, 2005

Baked Alaska with Peach Sorbet


I made this dessert for a Turkish blog-event featuring Peach recipes. The preparation is somewhat involved, but those of you who do not have to rush like me to meet a deadline can plan it over several days, and actually have fun making it.

I always wanted to make a baked Alaska, although the thought of using raw egg whites for the meringue topping kept bothering me. So, when I found out a few days ago that you can actually cook your meringue, I knew that it was time to try this classical summer dessert.

The Italian meringue took quite long to make, but otherwise, no difficulties were encountered during preparation. My Chef's torch came in very handy both to remove the frozen ice cream from the bombe mold and to finish off the cake. (However, I realized later that it may be even easier to line the mold with plastic wrap, so that's how I wrote down the recipe.) The result was definitely more than the sum of its parts, a refreshing dessert with a nice presentation.


  • 8" cake layer for base (recipe below)
  • 1 3/4 qt vanilla ice cream, softened
  • Peach sorbe, softened (recipe below)
  • Handful of shelled pistachios or almonds
  • Italian meringue topping (recipe below)
Spray the inside of an 8" bombe mold with cooking spray and line it with plastic wrap. Pack the base of the mold with vanilla ice cream. Scatter the nuts on top of the ice cream layer. Freeze until firm, then layer the peach sorbet on top of the vanilla ice cream. Smooth layers and freeze several hours or until very firm.

Place your cake layer on a baking sheet. Remove the ice cream from the freezer and invert the mold over the cake. Keep covered with plastic wrap and return to freezer.

Shortly before serving, preheat the oven to 425F. Take the cake out of the freezer and remove the wrap. Cover it completely with Italian meringue making sure that no ice cream is visible. Bake until the meringue is nicely colored. This should not take more than a couple of minutes. You can also use your kitchen torch like I did. But be more patient than me and keep at it to get a nicely browned topping.

Butter Cake Layer: from Sunset's Easy Basics for Good Cooking
  • 2 1/2 c sifted cake flour
  • 3 tsp baking powder
  • 1 1/4 c sugar
  • 1 tsp salt
  • 1/2 c butter, softened
  • 2 eggs
  • 1 tsp vanilla
(This makes more cake than you would need. You can cut it into layers, use one and freeze the leftovers.) Preheat oven to 375F. Grease and flour an 8" cake pan. Sift flour, sugar and salt into a bowl. Add the butter and 2/3 c milk. With an electric mixer, beat slowly at first to mix the ingredients, and at a medium speed later for about 2 minutes to build structure. Add the eggs, rest of the milk and vanilla; and continue beating for another 2 minutes. Pour batter into prepared pan. Bake until the cake browns on top and the sides start to pull away from the sides. Cool for 10 minutes, then turn out of pan and cool completely on a wire rack.

Peach Sorbet:
from National Peach Council
  • 1 1/2b fresh peaches, peeled, pitted and cut into chunks
  • 1/4 c orange juice
  • 2 tsp lemon juice
  • 1/2 c sugar
  • 1/2 c water
Put peaches and juices into a blender or food processor. Process until peaches are pureed. You should have approximately 2 1/2 c peach puree. Meanwhile, bring sugar and water to a boil. Reduce heat and simmer for 5 minutes. Remove from heat and cool to room temperature. Combine the puree and sugar syrup and follow manufacturer's directions to freeze it in your ice cream machine. Alternatively, pour the mixture in a shallow pan and put it in your freezer for at least 3 hours. During the freezing process, stir several times to prevent the formation of large ice crystals.

Italian Meringue:
  • 4 egg whites
  • 8-10 tbs sugar
  • 4 tbs water
  • 1/4 tsp cream of tartar
Combine all the ingredients in a bowl. Set the bowl in a pan of simmering water and beat with an electric mixer until the temperature of the meringue reaches 160F. Remove from the pan of simmering water, and continue beating until it cools down to room temperature. (Transferring it to a Kitchenaid mixer at this point may save your arm.)